menu Menu SCOUTING EVERYWHERE search Search
arrow_back Back

Scouting Everywhere

The site is under development. Please bary the UI glitches.

Showing posts with label Compass. Show all posts
Setting A Map
Tuesday, January 17, 2012

Note that a compass actually points to magnetic north, and not true north and you will need to take this into account for precise bearing and orientation work. For the time being I will ignore this magnetic variation, and explain how to orientate the map roughly north. Even this will help in finding surrounding features on the map.
To set up the map, that is to ensure that the map is facing north, you will obviously need some sort of compass. I will assume we are using a typical 'Silva' type compass.
  1. Rotate the dial on the compass so that the N marker is aligned with the direction of travel arrow at the top of the map.
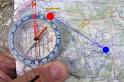
  2. Place the compass on the map. Line up the edge of the compass with a vertical (blue) grid line. (It is easier to line up the edge of a rectangular compass rather than try to align the direction of travel arrow with the grid line as this is partly obscured by the dial).
  3. Holding the compass and the map together (push down on the compass gently), rotate them as a whole so that the red arrow on the pointer (the piece that always faces north) aligns itself with the red arrow marked on the bottom of the dial itself (there will be some variation on this depending on what type of compass you have).
  4. As always, try to be as accurate as possible. Look directly down upon the two arrows to line them up. When this is done the map will now be facing north (ignoring magnetic variation, covered elsewhere). Try to keep the map in this position while you are using it. It is now ready for taking bearings and such like.
The process above is not complicated. It is a simple example of using a compass as described under bearings, except that we ensure the map also faces this direction.
READ MORE
How To Triangulate

You must first make sure you can identify several landmarks (at least 3 to on the safe side) both in real life and on the map. If you were to set up the map then you will find this task a little easier. Try to find landmarks that are evenly spaced. For example if you can see 3 prominent features try to pick ones that are about 120° apart. This will cut down on errors.

   1. Locate 3 prominent features approx. 120° apart
   2. Work out the bearing of one of the features
   3. Find the feature on the map
   4. Place the compass on the map so that the edge of the compass points towards the feature
   5. Rotate the entire compass until the meridian orienteering lines (the faint blue lines marked on the dial itself) are aligned with north on the map (e.g. a vertical blue grid line on the map). Note: This method has NOT taken magnetic variation into account and this may produce a serious error depending upon your position on the Earth
   6. Draw a line from the feature back towards your position (you should be on this line somewhere)
   7. Now repeat all of the above for the other landmarks
   8. Your approximate position should be where the lines intersect. In practice if you have taken 3 readings then the lines will produce a triangle ( in theory they should intersect but this rarely happens in practice!). Your position is somewhere within the triangle (hence why the process is called triangulation)

If you know your position to be on a easy to recognise feature (e.g. you are standing on top of a hill, in a stream or better still in a pub) then only one or two bearings should be needed. Simply look at where your line crosses the hill crest, stream or bar.
READ MORE
Triangulation
Thursday, September 8, 2011

Triangulation
Triangulation is a way of using the compass and map to fix your position. There will be times when you are not sure of your exact position, or indeed when you are completely and utterly lost! If you a map of the local area and you can see some prominent features then you can use the map and compass together to pin down where you are.

backlinks
READ MORE
Using Magnetic Variation
  • Locate the information on your map that tells you about the local magnetic variation. This can be found in the Key and also on the map itself.
    For the time being let us learn how to use the information on the key.
    'Different' Norths On a typical Landranger type map the information will look like this:
    Difference of true north from grid north at sheet corners
    NW corner - 1° 20' (24 mils) E
    NE corner - 0° 54' (16 mils) E
    SW corner - 1° 19' (23 mils) E
    SE corner - 0° 53' (16 mils) E
    Magnetic north varies with place and time. The direction for the centre of the sheet was about 4 ½° (80 mils) W of grid north in 1990 decreasing by about ½ ° (9 mils) in the next three years.
    To plot the average direction of magnetic north join the point circled on the south edge of the sheet to the point on the protractor scale on the north edge at the angle estimated for the current year.
    Note the last paragraph. This will be explained later.

  • To compensate for the angular difference take note of the average variation for the sheet (this is more than acceptable for any sensible work. If you really want to be perfect, take note of the difference between true north and grid north too). In our example sheet above this would give us a value of around 4° (4 ½° - ½° as we are long past 1990). (Note: A difference of 4°, if you walked in a straight line for 10 km would mean you would be around 700m away from your intended destination. So for most everyday uses of bearings the difference is negligible over sensible distances)

  • Measure your bearing as you would normally, ignoring magnetic variation.

  • When you have your bearing adjust the value by 4°. In our case we would have to ADD 4° to our bearing value to get a 'true-to-life' direction. If the diagram indicated that grid north lay to the left of magnetic north, you would have to subtract the angle from the bearing. 

  • You can now follow your compass bearing safe in the knowledge that you will be heading in the correct direction.
READ MORE
Plotting Variation On Ordnance Survey Maps

Note the last paragraph in the map extract on magnetic variation above. If you look carefully at your map, at the top and bottom of the map (usually in the centre) will be the information above.

If you draw two lines connecting the circle at the bottom to the two arrows at the top of the map you will have a large version of the diagram in the first table going across your map. This will illustrate how the magnetic variation becomes increasingly important the further the distance you are travelling in a straight line. Imagine travelling 40 km (40 grid squares) along these lines, and then look at how far away from your intended destination you will be (measure 40 km along each line and compare the distance between the two end points). This would be your error if you did not take magnetic variation into account. (On this map the distance is almost exactly 4 km 'as the crow flies') As I have said earlier, if you think about it this is not a great deal (in relation to other errors and considering that we very rarely travel 40 km in a straight line without any checks that is...of course 4 km on its own IS a large error!), and for most situations we do not concern ourselves with this correction, but in some work it may be important, and it may be more important at your location.
READ MORE
Magnatic Variation
The important thing here is to remember that a compass points not to true north (e.g. the north pole, the geographical northernmost point of the Earth) but to magnetic north (the magnetic north end of the Earth's 'bar magnet'). These two are not in the same position (indeed the position of magnetic north varies with time).

The apparent position of magnetic north will vary according to your location in the world (most importantly your latitude) and you will need to know the difference between these two positions (magnetic and true north) to take an accurate bearing. Information on the deviation between the two will be found on any (Ordnance Survey) map, and should not be assumed as it can vary by a relatively large amount according to your location.

If the deviation is not given you can find it from the Pole Star or by using the watch method to point to north. Then lining up the compass with the grid lines on the map you can discover the variation if there is one.
READ MORE
Using A Bearing
Bearing
When following a bearing (i.e. attempting to walk in the direction indicated by the compass) do not just try to look at the compass and walk in a straight line. Even when trying hard to walk in a straight line on flat ground there is usually a natural tendency to deviate slightly (normally off to the right for right handed people) and in any case, the landscape is hardly ever nice and flat. There will always be reasons to deviate off your intended path, that clump of trees, those holly bushes, that mountain spur. Even with flat ground and good 'seeing' it is very tiring to continually check your progress against the compass.

The best thing to do is to look along your bearing (taking care that the compass pointers are aligned as best you can) and notice a landscape feature that lays along that path (e.g. "that large gnarled oak tree over there"). Then you can effectively forget about the compass and just make your way to that feature along the best possible root. Take regular sightings of the feature in case you lose sight of it during your 'detours'. When you reach the feature, simply take the same bearing again, (i.e. sight along the compass again) and repeat, looking for a prominent feature. With practice this is a very quick, yet still accurate method of travel. Of course it is not very effective in very poor weather conditions, at night, or in featureless landscapes, and there you will have to rely on regular (frequent!) checks on your compass. But for most situations it is effective.
                           
 
READ MORE
Taking A Bearing

To take a bearing between two points follow these steps (again I will assume we are using a common 'Silva' type compass). Note the two alternative methods at steps 1 and 4:
  1. Leave the map as it is (in any old direction) OR [Set up the map so that it is facing north.]
  2. Locate the point at which you wish to walk from, point A, (i.e. usually your current location) and the point you wish to walk to, point B.
  3. Align the compass edge (assuming it is rectangular) so that it forms a line between these two points. Note that the compass should be facing in the correct direction (the direction of travel arrow should be pointing towards the place you want to go, the bottom of the compass is placed at your current location). If the compass is not long enough to do this, use a ruler or similar to join the two points and place the compass alongside this. The compass does not have to have the direction of travel arrow touching the two points (i.e. parallel lines will have the same bearing).
  4. Rotate the dial so that the faint vertical lines on the dial itself align themselves with the vertical (blue) grid lines on the map OR [Rotate the dial so that the red marker on the bottom of the dial matches up with the red end of the north-south pointer]
  5. You can now pick up the compass if you wish. Read off the number on the dial against the direction of travel arrow (there will usually be a small black marker to help you in this). This 3 digit number is the bearing of B from A. (Do not worry too much about the 3 digit business. If the angle marked is 30° it should be called 030° but this does not really matter too much). As always be careful about how many degrees each line on your compass represents. There are many different types with different markings, but usually each small line is worth 2° with intervals of 20° marked on the dial in writing.
  6. If you wish to walk in a straight line from A to B, simply keep an eye on the compass and follow the direction of travel arrow. You must take care to ensure that the two red pointers (north-south and red marker on the bottom of the dial) remain aligned at all times.
READ MORE
Bearing
Wednesday, September 7, 2011

A bearing is a 3 digit angle measured clockwise from north. It is a way of indicating direction without ambiguity. We usually speak of taking a bearing between 2 points, or the bearing of the pub from the church. We may need to use a bearing when the weather conditions are poor, or the surrounding landscape is unfamiliar or featureless. Then navigating by the map alone may not practical, and we may have to rely on the compass to tell us the direction in which we wish to travel. You may also need to take bearings when trying to pinpoint your position on the map by triangulation. Either way the process is quite simple once you get used to it. (Note: For accurate bearings you will need to take into account the magnetic variation, but here I will ignore this for simplicity).
READ MORE
Compass Points
Tuesday, September 6, 2011

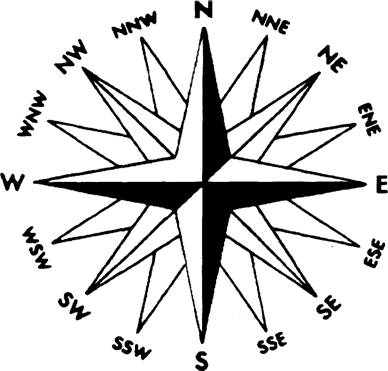
All you have to remember are the four main points of the compass. All the other points are made by combining these four. (for instance halfway between north and east is northeast).
Some silly ways to remember the order of the points are to recall the following phrases. The points start at the top and go around clockwise.
Never Eat Shredded Wheat
Naughty Elephants Squirt Water
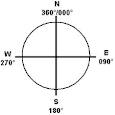
If you wish to quote a more accurate direction you can either opt for a more complicated compass point;  North by Northeast is a position halfway between north and northeast. Note that the convention for naming points of this type is to quote the 'more important' compass point first. For example, halfway between southwest and west would be called West by Southwest (and not Southwest - West). or you can resort to quoting an angle measured clockwise from North (in degrees); Recall there are 360° in a circle. So North would be 0°. East would be 90°. South - 180° and West 270°. As another example, Northeast would be 45° (halfway between north and east).  The advantage of quoting in degrees is speed and accuracy (a direction of 208° is not an obvious compass point!). This is related to bearings.
READ MORE
Typical Compass
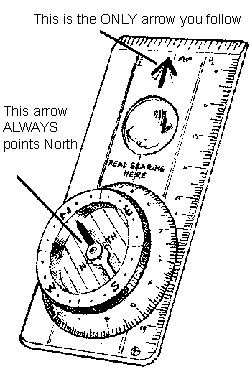
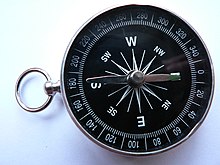
A typical (Silva type) compass consists of a magnetic strip of metal, suspended or pivoted (so it can swing freely) within a moveable dial. The dial is usually liquid filled (this dampens the oscillation of the needle allowing it to settle into position much more quickly) and has several parallel lines marked on the dial itself. The compass should have a clear plastic base plate with straight edges. Along the edges should be scales in both metric (cm and mm) and imperial (inches). Some may have additional features such as a magnifying area and degrees of declination/magnetic variation (usually marked on the compass dial). A wrist strap is another important feature if you want to keep the compass.

There are usually 3 different types of arrow marked on the compass. As indicated in the diagram, the vertical arrow marked on the plastic background is your direction of travel arrow. This is the only arrow you ever follow.

The arrow that spins in the middle of the compass (usually coloured red and white) always turns to point north (the red end is the end that points north). NEVER follow this arrow (because you will always be walking north then, no matter where you actually wanted to go!) When using a compass try not to hold it near any metal or any magnets else this arrow will be attracted to them and you will end up going in the wrong direction. Depending on where you are simply placing the compass near the floor may give you an inaccurate reading due to iron and mineral deposits in the ground. Always check you have the same reading at ground level and when standing up.

The third arrow is the one that will be marked upon the dial. (you cant actually see this on the picture). It is usually a red arrow marked on the bottom of the dial. This is the one that will match up with the red and white pointer that spins. When you want to read a number off the dial, look at the point where it touches the line at the top (the one marked by ‘read bearing here’), this is the number you want.
READ MORE
The Spinning Nature

Because a compass is based upon a magnet the needle can be affected by magnetic fields and materials such as iron. For instance your belt buckle, a zip, karibiner. Even mineral deposits in the ground can offset your compass. Don't just look down either. Look around and above you. Sitting under a power line or near an electric motor will not do you any favours.
READ MORE
Choosing A Compass

Choose your compass with care. The most appropriate type for use in scouting is probably the orienteering compass. A good one will have a well balanced steel magnetic needle that settles into position quickly. The needle should be coloured differently at each end, usually red at the north end. If the tip glows in the dark then even better.

The base plate and dial are usually strong plastic. The dial will have increments of around 2° marked clearly. On the dial itself will be faint meridian lines (faint parallel blue lines pointing in the same direction as north on the dial). Some even have extra information such as magnetic variation or declination degrees marked on the dial. The dial also has an arrow marked on the bottom aligned with north on the dial.

The base plate should be transparent and have scales in both metric (cm and mm) and imperial (inches). A magnifying glass, clinometer, sighting mirror and adjustable declination screw are all welcome extras.

Don't forget a strong strap attached to the base plate which should be securely held at the other end to your shirt pocket buttonhole or around your neck. There are several different types of compass available. These may range from the simple 'toy' compass which has a fixed dial to the more technical prismatic compass. Here we will concentrate on the most suitable compass for scouting, the orienteering type compass.

READ MORE
16 Points
Sunday, July 3, 2011
The 16 Points Of A Compass
The sixteen points of compass are divided into three parts as follows:

(i) Cardinal Points (PRIMARY)
  • North
  • South
  • East
  • West
(ii) Half Cardinal Points (TERTIARY)
  • North - East
  • South - East
  • South - West
  • North - West
(iii) Three Letter Points (TERTIARY)
  • North - North - East
  • East - South - East
  • East - South - East
  • South - South - East
  • South - South - West
  • West - South - West
  • West - North - West
  • North - North - West

READ MORE
Compass
Saturday, July 2, 2011

A Compass

       A Compass is a navigational instrument for determining direction relative to the Earth's magnetic poles. It consists of a magnetized pointer (usually marked on the North end) free to align itself with Earth's magnetic field. A compass is any magnetically sensitive device capable of indicating the direction of the magnetic north of a planet's magnetosphere. The face of the compass generally highlights the cardinal points of north, south, east and west. Often, compasses are built as a stand alone sealed instrument with a magnetized bar or needle turning freely upon a pivot, or moving in a fluid, thus able to point in a northerly and southerly direction.
      The compass greatly improved the safety and efficiency of travel, especially ocean travel. A compass can be used to calculate heading, used with a sextant to calculate latitude, and with a marine chronometer to calculate longitude. It thus provides a much improved navigational capability that has only been recently supplanted by modern devices such as the Global Positioning System (GPS).
         The compass was invented in ancient China around 247BCE, and was used for navigation by the 11th century. The dry compass was invented in medieval Europe around 1300. This was supplanted in the early 20th century by the liquid-filled magnetic compass.
       Other, more accurate devices have been invented for determining north that do not depend on the Earth's magnetic field for operation (known in such cases as true north, as opposed to magnetic north). A gyrocompass or astrocompass can be used to find true north, while being unaffected by stray magnetic fields, nearby electrical power circuits or nearby masses of ferrous metals. A recent development is the electronic compass, either a magnetometer or a fibre optic gyrocompass, which detects the magnetic directions without potentially fallible moving parts. A magnetometer frequently appears as an optional subsystem built into hand-held GPS receivers. However, magnetic compasses remain popular, especially in remote areas, as they are relatively inexpensive, durable, and require no power supply.
READ MORE
share Share linkedin Twitter Facebook Google+