menu Menu SCOUTING EVERYWHERE search Search
arrow_back Back

Scouting Everywhere

The site is under development. Please bary the UI glitches.

Triangulation


Triangulation
Triangulation is a way of using the compass and map to fix your position. There will be times when you are not sure of your exact position, or indeed when you are completely and utterly lost! If you a map of the local area and you can see some prominent features then you can use the map and compass together to pin down where you are.

backlinks

Using Magnetic Variation

  • Locate the information on your map that tells you about the local magnetic variation. This can be found in the Key and also on the map itself.
    For the time being let us learn how to use the information on the key.
    'Different' Norths On a typical Landranger type map the information will look like this:
    Difference of true north from grid north at sheet corners
    NW corner - 1° 20' (24 mils) E
    NE corner - 0° 54' (16 mils) E
    SW corner - 1° 19' (23 mils) E
    SE corner - 0° 53' (16 mils) E
    Magnetic north varies with place and time. The direction for the centre of the sheet was about 4 ½° (80 mils) W of grid north in 1990 decreasing by about ½ ° (9 mils) in the next three years.
    To plot the average direction of magnetic north join the point circled on the south edge of the sheet to the point on the protractor scale on the north edge at the angle estimated for the current year.
    Note the last paragraph. This will be explained later.

  • To compensate for the angular difference take note of the average variation for the sheet (this is more than acceptable for any sensible work. If you really want to be perfect, take note of the difference between true north and grid north too). In our example sheet above this would give us a value of around 4° (4 ½° - ½° as we are long past 1990). (Note: A difference of 4°, if you walked in a straight line for 10 km would mean you would be around 700m away from your intended destination. So for most everyday uses of bearings the difference is negligible over sensible distances)

  • Measure your bearing as you would normally, ignoring magnetic variation.

  • When you have your bearing adjust the value by 4°. In our case we would have to ADD 4° to our bearing value to get a 'true-to-life' direction. If the diagram indicated that grid north lay to the left of magnetic north, you would have to subtract the angle from the bearing. 

  • You can now follow your compass bearing safe in the knowledge that you will be heading in the correct direction.

Plotting Variation On Ordnance Survey Maps


Note the last paragraph in the map extract on magnetic variation above. If you look carefully at your map, at the top and bottom of the map (usually in the centre) will be the information above.

If you draw two lines connecting the circle at the bottom to the two arrows at the top of the map you will have a large version of the diagram in the first table going across your map. This will illustrate how the magnetic variation becomes increasingly important the further the distance you are travelling in a straight line. Imagine travelling 40 km (40 grid squares) along these lines, and then look at how far away from your intended destination you will be (measure 40 km along each line and compare the distance between the two end points). This would be your error if you did not take magnetic variation into account. (On this map the distance is almost exactly 4 km 'as the crow flies') As I have said earlier, if you think about it this is not a great deal (in relation to other errors and considering that we very rarely travel 40 km in a straight line without any checks that is...of course 4 km on its own IS a large error!), and for most situations we do not concern ourselves with this correction, but in some work it may be important, and it may be more important at your location.

Magnatic Variation

The important thing here is to remember that a compass points not to true north (e.g. the north pole, the geographical northernmost point of the Earth) but to magnetic north (the magnetic north end of the Earth's 'bar magnet'). These two are not in the same position (indeed the position of magnetic north varies with time).

The apparent position of magnetic north will vary according to your location in the world (most importantly your latitude) and you will need to know the difference between these two positions (magnetic and true north) to take an accurate bearing. Information on the deviation between the two will be found on any (Ordnance Survey) map, and should not be assumed as it can vary by a relatively large amount according to your location.

If the deviation is not given you can find it from the Pole Star or by using the watch method to point to north. Then lining up the compass with the grid lines on the map you can discover the variation if there is one.

Using A Bearing

Bearing
When following a bearing (i.e. attempting to walk in the direction indicated by the compass) do not just try to look at the compass and walk in a straight line. Even when trying hard to walk in a straight line on flat ground there is usually a natural tendency to deviate slightly (normally off to the right for right handed people) and in any case, the landscape is hardly ever nice and flat. There will always be reasons to deviate off your intended path, that clump of trees, those holly bushes, that mountain spur. Even with flat ground and good 'seeing' it is very tiring to continually check your progress against the compass.

The best thing to do is to look along your bearing (taking care that the compass pointers are aligned as best you can) and notice a landscape feature that lays along that path (e.g. "that large gnarled oak tree over there"). Then you can effectively forget about the compass and just make your way to that feature along the best possible root. Take regular sightings of the feature in case you lose sight of it during your 'detours'. When you reach the feature, simply take the same bearing again, (i.e. sight along the compass again) and repeat, looking for a prominent feature. With practice this is a very quick, yet still accurate method of travel. Of course it is not very effective in very poor weather conditions, at night, or in featureless landscapes, and there you will have to rely on regular (frequent!) checks on your compass. But for most situations it is effective.


Taking A Bearing

To take a bearing between two points follow these steps (again I will assume we are using a common 'Silva' type compass). Note the two alternative methods at steps 1 and 4:
  1. Leave the map as it is (in any old direction) OR [Set up the map so that it is facing north.]
  2. Locate the point at which you wish to walk from, point A, (i.e. usually your current location) and the point you wish to walk to, point B.
  3. Align the compass edge (assuming it is rectangular) so that it forms a line between these two points. Note that the compass should be facing in the correct direction (the direction of travel arrow should be pointing towards the place you want to go, the bottom of the compass is placed at your current location). If the compass is not long enough to do this, use a ruler or similar to join the two points and place the compass alongside this. The compass does not have to have the direction of travel arrow touching the two points (i.e. parallel lines will have the same bearing).
  4. Rotate the dial so that the faint vertical lines on the dial itself align themselves with the vertical (blue) grid lines on the map OR [Rotate the dial so that the red marker on the bottom of the dial matches up with the red end of the north-south pointer]
  5. You can now pick up the compass if you wish. Read off the number on the dial against the direction of travel arrow (there will usually be a small black marker to help you in this). This 3 digit number is the bearing of B from A. (Do not worry too much about the 3 digit business. If the angle marked is 30° it should be called 030° but this does not really matter too much). As always be careful about how many degrees each line on your compass represents. There are many different types with different markings, but usually each small line is worth 2° with intervals of 20° marked on the dial in writing.
  6. If you wish to walk in a straight line from A to B, simply keep an eye on the compass and follow the direction of travel arrow. You must take care to ensure that the two red pointers (north-south and red marker on the bottom of the dial) remain aligned at all times.

Bearing

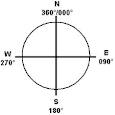
A bearing is a 3 digit angle measured clockwise from north. It is a way of indicating direction without ambiguity. We usually speak of taking a bearing between 2 points, or the bearing of the pub from the church. We may need to use a bearing when the weather conditions are poor, or the surrounding landscape is unfamiliar or featureless. Then navigating by the map alone may not practical, and we may have to rely on the compass to tell us the direction in which we wish to travel. You may also need to take bearings when trying to pinpoint your position on the map by triangulation. Either way the process is quite simple once you get used to it. (Note: For accurate bearings you will need to take into account the magnetic variation, but here I will ignore this for simplicity).

Compass Points


All you have to remember are the four main points of the compass. All the other points are made by combining these four. (for instance halfway between north and east is northeast).
Some silly ways to remember the order of the points are to recall the following phrases. The points start at the top and go around clockwise.
Never Eat Shredded Wheat
Naughty Elephants Squirt Water
If you wish to quote a more accurate direction you can either opt for a more complicated compass point;  North by Northeast is a position halfway between north and northeast. Note that the convention for naming points of this type is to quote the 'more important' compass point first. For example, halfway between southwest and west would be called West by Southwest (and not Southwest - West). or you can resort to quoting an angle measured clockwise from North (in degrees); Recall there are 360° in a circle. So North would be 0°. East would be 90°. South - 180° and West 270°. As another example, Northeast would be 45° (halfway between north and east).  The advantage of quoting in degrees is speed and accuracy (a direction of 208° is not an obvious compass point!). This is related to bearings.

Typical Compass

A typical (Silva type) compass consists of a magnetic strip of metal, suspended or pivoted (so it can swing freely) within a moveable dial. The dial is usually liquid filled (this dampens the oscillation of the needle allowing it to settle into position much more quickly) and has several parallel lines marked on the dial itself. The compass should have a clear plastic base plate with straight edges. Along the edges should be scales in both metric (cm and mm) and imperial (inches). Some may have additional features such as a magnifying area and degrees of declination/magnetic variation (usually marked on the compass dial). A wrist strap is another important feature if you want to keep the compass.

There are usually 3 different types of arrow marked on the compass. As indicated in the diagram, the vertical arrow marked on the plastic background is your direction of travel arrow. This is the only arrow you ever follow.

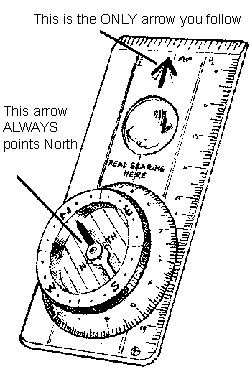
The arrow that spins in the middle of the compass (usually coloured red and white) always turns to point north (the red end is the end that points north). NEVER follow this arrow (because you will always be walking north then, no matter where you actually wanted to go!) When using a compass try not to hold it near any metal or any magnets else this arrow will be attracted to them and you will end up going in the wrong direction. Depending on where you are simply placing the compass near the floor may give you an inaccurate reading due to iron and mineral deposits in the ground. Always check you have the same reading at ground level and when standing up.

The third arrow is the one that will be marked upon the dial. (you cant actually see this on the picture). It is usually a red arrow marked on the bottom of the dial. This is the one that will match up with the red and white pointer that spins. When you want to read a number off the dial, look at the point where it touches the line at the top (the one marked by ‘read bearing here’), this is the number you want.

The Spinning Nature

Because a compass is based upon a magnet the needle can be affected by magnetic fields and materials such as iron. For instance your belt buckle, a zip, karibiner. Even mineral deposits in the ground can offset your compass. Don't just look down either. Look around and above you. Sitting under a power line or near an electric motor will not do you any favours.

Choosing A Compass


Choose your compass with care. The most appropriate type for use in scouting is probably the orienteering compass. A good one will have a well balanced steel magnetic needle that settles into position quickly. The needle should be coloured differently at each end, usually red at the north end. If the tip glows in the dark then even better.

The base plate and dial are usually strong plastic. The dial will have increments of around 2° marked clearly. On the dial itself will be faint meridian lines (faint parallel blue lines pointing in the same direction as north on the dial). Some even have extra information such as magnetic variation or declination degrees marked on the dial. The dial also has an arrow marked on the bottom aligned with north on the dial.

The base plate should be transparent and have scales in both metric (cm and mm) and imperial (inches). A magnifying glass, clinometer, sighting mirror and adjustable declination screw are all welcome extras.

Don't forget a strong strap attached to the base plate which should be securely held at the other end to your shirt pocket buttonhole or around your neck. There are several different types of compass available. These may range from the simple 'toy' compass which has a fixed dial to the more technical prismatic compass. Here we will concentrate on the most suitable compass for scouting, the orienteering type compass.

Tin Cans

Empty tin cans can be a bane at many campsites. They are difficult to dispose of. Quite simply you have two choices.
You either burn them, then bash them flat and bury them or you crush them and carry them home.
Most modern tins can be recycled now so simple clean them, flatten them and store apart from the others.

Web Directories


Incinerator

If the site does not have an incinerator of its own you will need to make one. Any rubbish that can not be burned on the campfire should be placed in the incinerator. The ashes should be removed at regular intervals and disposed of as above.
You will need a large metal can (an 'oil-drum' type is ideal). Pierce the can with holes all round and place over a fire. You may find it easier to fill the can with earth and use a large nail or spike when making the holes.

Oil Can Filter


A filter will be required for all those mucky and greasy wet items you want to dispose of. If you are allowed to dig into the ground at your site, make yourself a trench a just bigger than your can, and at least 30cm deep. Stuff your oil can with grass, leaves and bracken.
Place a grid (either metal or make a lattice from natural materials) over the hole and place the filter on top. Make sure you replace the filter materials often.
Use to filter any wet, or more useful, greasy waste.

Dry Bin


Only washed items should be placed in the bin. Any cans or containers must be flattened first.

Wet Bin


Most campsites frown upon anyone digging holes in the ground, most certainly when they intend to leave some form of waste in the hole! Instead you will want to construct a bin. You will need two types, a wet and dry.

The details of construction have already been covered in the camp gadgets section.
Make sure you replace the bin bag at regular intervals and either store in a place that is out of reach of any person/animal or, ideally, immediately dispose of this rubbish at an appropriate area. Most campsites have proper bins for waste disposal anyhow, but if you are camping in the middle of nowhere, you will either bury your rubbish or take it home with you!

Dry Pit

A dry pit is constructed as above. The two pits should be next to each other, and fairly close to the campfire and kitchen area. For the dry pit you simply need a 'hole-in-the-ground'. Only place thoroughly washed or burnt material here, otherwise you will have animal visitors and insects paying you a visit, making life in camp a bit more uncomfortable! 
Never place any glass or sharp materials (e.g. a ripped tin can) in the pit.
When you have finished with the pit, it should be filled in with earth and completely covered. It should then be marked with a sign placed into the ground at that point with a date on which it was created.

Wet Pit


If permitted a simple wet and dry pit should see to most of your needs. Simple to construct, you just excavate an area around a metre square, and at least 20 cm deep. Clearly rope off and mark the pit, and make sure it is placed so that people will not be falling in it every two seconds.
Cover with a layer of interlaced sticks and a filter layer of grass/ leaves etc. These layers should be renewed daily.

When you have finished with the pit, it should be filled in with earth and completely covered. It should then be marked with a sign placed into the ground at that point with a date on which it was created.

Waste Disposal

Waste will be disposed of. That should be the rule for camp.
Simply do not leave any waste, of any description, anywhere at any time.
When you arrive at the site you should already know what the warden/landowner wishes you to do with any rubbish (you don't? Go and ask now). My knowledge of local, 'modern' sites is that they have specific areas for rubbish disposal, clearly placed bins, and an incinerator of their own. They also tend not to let people dig any pits/trenches for any use (campfire, rubbish disposal or latrines). Make sure you know what you can and cannot do on your site.


Toilets - Sitearea

If you are using existing toilets you will have little choice about their location. If you have to camp close to toilets make sure they are downwind of the rest of your campsite (your campsite should not be next to the toilets in any case). If you have had to construct your own, make sure they are in fact 'off-site' and downwind of the prevailing wind.

They should be clearly marked and screened from view. Ideally some washing facility should be placed by the toilets themselves. Latrines should be dug downhill of the camp and away from the water supply as well. You must be careful not to dig them too far away otherwise people will be tempted to 'go' somewhere closer to hand!

Tentage - Sitearea

Where you place your tentage will determine the layout of the rest of the camp to a large extent. Tentage should be placed towards the outer edge of the site if possible (not in the middle of the field!). Choose a flat area, clear of any roots/rocks. Do not place tents right next to trees (especially solitary trees that will attract any lightning!), and be sure to look above as well as around on the floor. Look out for any possible 'deadfalls' from the surrounding trees. Common sense says that no tentage should be placed near the campfire/ chopping area/toilets.

Care should be taken in the relative positions of the tents. No tents should be placed immediately next to the site entrance/exit. Leaders tents should be placed in between the 'scouts' tents and the entrance. If you have more than one leaders tents, then place them at either end of the line of tents. Otherwise all the tents that will be used for 'living/sleeping' should really be placed in the same area, rather than spread around the site.

A first aid tent should be provided for any camp under canvas. This first aid tent must not be used for anything other than first aid, no sleeping/storing etc. It should be clearly marked and a full first aid kit kept inside at all times.

If you have any storage tents you may want to place them closer to the areas where they will be used (e.g. the kitchen area).

Washing Area - Sitearea


If you have a washing area (if you are not using any of the camps toilet facilities) then this should be placed towards the centre of the site as a whole. As it will be used not only for personal washing, but washing the dishes etc. it should be within a short distance of the cooking/dining area.
If you are using natural running water, care should be taken to establish a point from which you will take drinking water. You must then ensure that no-one washes, cleans pots etc. upstream of this point.

Storage - Sitearea

Mention has been made of storage tents below. If you do not have a first aid tent, then the storage tent must contain a full first aid kit placed within easy reach by the door. Any items stored in the tent must be off the ground, place on a platform constructed from natural materials or a table.
Storage could also include your own tents. Any clothing/equipment not being used should be neatly stored away in your bag/rucsac and placed within the tent.
During the day, 'store' your sleeping bags and any wet clothes on an airing line. Simply erect two uprights and place a rope between them to hang the items on. This airing line should be at the upward edge of your camp out of the way of all the other areas.
Also during the day, if you have room and the weather permits, pull your groundsheet out of your tent and store to one side to let your tent air, and the ground 'recover'.

Dining Area - Sitearea

A dining area can be immediately adjacent to the cooking area. It should be sheltered from the elements, and have easy access to where the food is prepared. You will need some form of seats/ tables to eat from, make your own if you have brought none.Waste food etc. should be cleanly disposed of in nearby 'bins'.

Cooking Area - Sitearea

Your cooking area should be placed fairly close to the campfire, away from the tentage and ideally close to a clean water supply. Your cooking area includes area for food preparation, serving, utensil storage and food storage. It should be within a shelter (even if you have no mess tents/dining shelters you can construct a simple shelter that at least provides cover from the rain). All food (storage and preparation) should be done off the ground. If you have no tables construct a table/dresser from natural materials (see camp gadgets). Water can be stored on the ground as long as it is in good quality, sealed containers. Your cooking area must be kept clean at all times. There should be several 'bins' for wet and dry refuse. All utensils/pots etc. should be stored off the ground in a clean environment.

If you are cooking under a shelter with gas, the gas bottle itself should be outside the shelter if possible. Common sense dictates that any flame should be away from the sides of the shelter, and any fire should be on a sturdy rest that will not fall, or get knocked over. If cooking within the shelter a water container of some description must be kept nearby for the sole purpose of safety. It is to be kept full, ready to hand, and not used for any other purpose.

Chopping Area - Sitearea

Place your chopping area adjacent to your woodpile. The area should be clearly marked and 'roped-off' forming a circle that is at least 2 arm+axe lengths in radius. I would suggest that when you rope the area off that you drive uprights into the ground and run a rope around the perimeter at around 30 cm off the ground. There should be an entrance/exit left for ease of use, and by this should be a post at which the user can leave any loose clothing before they enter the chopping area.

Inside the chopping area you may want to place a log (in which you can store the axe when not in use, although they should have a sheath as well for when the weather turns). A chopping block of some description will really be needed. It is much more comfortable, and safer, to aim your swings at a block that is at a certain height, then at the piece of wood lying on the floor. A simple tree stump or large log turned on its end will normally suffice.

Woodpile - Sitearea

It is common sense that your woodpile should be within a short distance of your campfire. The wood should be graded and arranged into different sections. Woodpiles may differ in appearance, from the simple 'stack-it-on-the-floor' to the more complex wood shed. Even a simple stack should be provided cover against the elements, even if it is only a bin liner pegged over the top of the pile.
Ideally you should have a store of kindling as well, this most certainly should be kept dry.

Campfire - Sitearea

Ideally the campfire should be located fairly close to the centre of the campsite. You must take into account the prevailing wind direction before you set up any area of your campsite. You will not want the wind blowing the smoke and embers towards any tentage (or indeed any other area), and the prevailing wind will also determine your type and layout of the fire itself.

Position your campfire downwind of the rest of your campsite. If there is not already a fireplace you will need to clear the ground for a distance of around 2m of any dirt/grass/leaves etc., or use a form of trench fire.

Locating Your Campsite

If you are not actually on a 'campsite', for example when out hiking in remote regions, then care should be taken when deciding the actual location of your campsite (before we come to layout).
If you are on high, exposed ground go down to find a sheltered spot. Similarly though, when on low, wet ground seek higher shelter. Look for somewhere sheltered from the wind, on rising ground that has no risk of flooding, and no risk of rockfalls/avalanches.

Remember that hot air rises, cold air sinks. Valley bottoms often contain pockets of colder air, and can be areas for frost and damp mist.

Ideally you should be near a good, clean water supply (although not too close. Pitching camp near the water you will be invaded by insects!). On river banks look for the high water mark, and be wary of flash floods in mountain ranges where streams can suddenly turn into 5m of water with almost no warning!

Choose ground that is reasonably flat and free of rocks and roots.

Don't forget to check above your head too. Look for dead wood in trees that could fall, bee's and hornet's nests are not very nice neighbours either. Keep away from solitary trees as they attract lightning. In forested areas keep to the edges of the forest. Take careful note of any tracks, including those made by game. You will not want unwelcome animal visitors in the night.
Do NOT camp at the following;
  • Hilltops exposed to wind (move down and look for shelter on the leeside)
  • Valley bottoms and deep hollows. They could be damp and more liable to frost
  • Hillside terraces where the ground holds moisture
  • Spurs which lead down to water (often routes to animals watering holes)

Broken Handles


Using an axe takes a lot of practice and occasionally along the way handles get broken. This usually occurs when the head misses the target and the handle takes all the force from the blow. To remove a broken handle, the easiest way is to put it in a fire, burying as much as possible of the metal in the earth (to prevent it losing temper).

Never attempt to repair an axe handle.

Never use any axe that has a damaged or split handle.

Fitting An Axe With A Handle

If the head is loose you can soak the axe for a few hours in a bucket of water but this will only ever be a temporary fix (the wood will swell and the handle will be tight for a little while). Ideally you need to replace the handle or at least replace the wedge.

Saw off the old handle close to the axe head (Note: you should not just burn the handle off as this will cause the bit to lose its temper, note the above arrangements) and drill out the wood that is left in the axe head. You can punch the rest of the wood backward from the handle side and then clean inside the hole.

Get the new handle and pound it into the head. Make sure the handle passes out the other side by at least an inch. Also be sure that the new handle is correctly aligned.

Put some glue on a wedge and in the slit for the wedge in the end of the handle (you did make a slit didn't you?) and then drive in the wedge. You can now saw off the excess handle and wedge.
It would be a good idea to fix the wooden wedge in place with a steel wedge, placed diagonal to the wooden wedge.

Splitting Logs


For a large log, as before, stand behind the log with your feet well apart. Swing down the cut the side away from you. Do not chop downwards. If you wish to split a smaller log, lay it against another log. Do not put your foot on it. There is an alternative to this though, hold the smaller log against the cutting edge and bring them both down together on to a larger log.


If in doubt, or if you have any difficulty, split larger logs with a wedge and a rock. Do not hold the wood upright in your hand and try to split with an axe.

When chopping branches from a large log, always stand on the side away from the axe. Always cut branches from the outside of the fork, not the inside.


Before you do anything else, check overhead for dead branches which may fall and injure you, and for things like hornets nests. Clear the area around the tree of any undergrowth or branches that could deflect your blows. If the tree has a particularly large spread of roots or boles around the base you may want to construct a platform so that you can reach a thinner part of the trunk and save time and effort. Obviously if you do this make sure the platform is stable and you have a clear route of escape (in case something goes wrong!).

Cut from both sides of the tree. First you chop a notch out at an angle of about 45 degrees and then another on the opposite side at a lower level, on the side which you want the tree to fall. Do not cut through more than half the tree before starting the other notch. You must work at a height that is comfortable for you. Try to cut downwards at 45 degrees (you may need a horizontal cut occasionally to clear debris etc.).

A steady rhythm of blows will cut much more efficiently than fewer big blows. If you put too much effort behind the axe your aim will suffer, you will tire and then every swing becomes more dangerous. Always let the weight of the axe do the work.

Alternating the angle of the stroke will prevent the axe from jamming. Too steep an angle will cause the axe to glance off, end-on will make the axe jam (or simply be inefficient). Try to aim for a 45 degree angle.

Carrying an Axe

Carry an axe by holding it just under the head. Point the blade down or away from you to minimize the chance you will fall on top of the blade if you trip.

Making An Axe

 
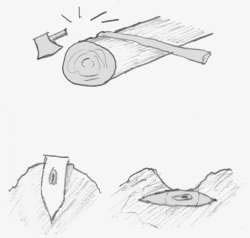
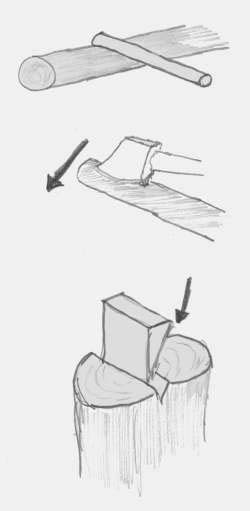
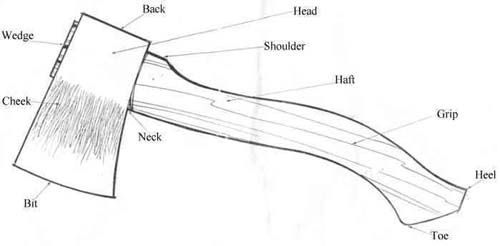
First you will need to select the wood for your handle, any straight, knot-free hardwood will be suitable (ash and hickory are ideal). Cut two notches into the fluke of a buttress, spaced to the desired handle length. Hit along the side of the fluke close to the cuts. It will split away at their depth.

Next you will need to fit the head. Whittle the handle into shape with one end cut to fit the hole in the axehead. Make sure you cut a notch in this end that is going into the axe head and make a wedge to fit the notch. With the head in place, drive the wedge into the notch and then soak the axe in water overnight (this will tighten the head onto the handle as it soaks up the water). Always check your axehead for tightness before you use them.

Using An Axe


Most people with have a 'prime' hand and a natural swing. Always use the axe in a way that is comfortable to you, swinging in an arc that feels natural. Make sure you have a firm grip, and always swing AWAY from your body, hands, and legs. Ensure that if you miss your intended target and follow through, the axe will not strike you or anyone else. Never throw an axe on the ground, always sheath it or bury it in a log.

Chopping Areas


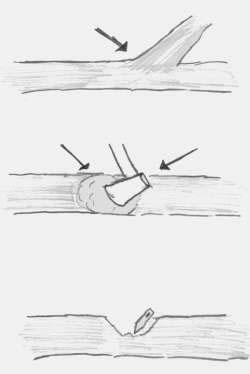
When chopping wood at camp, you will need to create a specific chopping area. Choose a site that is fairly close to the fire and clear of any obstructions (not only on the ground. Ensure there are no overhead obstructions that could catch your axe as you swing). Make a circle that is at least 2m (6 ft) in radius (or at least 3 axe lengths). Rope this area off and ensure it is clearly marked. Make sure that everyone knows where the chopping area is. No loose clothing should be taken into the area, and no one should enter the area without strong shoes or boots (and of course checking it is safe to enter).

Sharpening An Axe

An axe with a blunt edge becomes no more than an inefficient hammer, and indeed a great deal more dangerous as you struggle to use it. Always keep your axe sharp. For large 'burrs' a file is probably your best bet. Make sure you use the file correctly though, it will only work in one direction, it works when pushed, not pulled.

To sharpen your axe prop the axehead between a log and a peg driven into the ground. Always try to sharpen inwards from the cutting edge (to avoid producing any burrs). First use a file or rough stone to remove any burrs and rucks. Then finish with a smoother stone, using a circular motion. Don't drag the stone off the cutting edge, push on to the blade.

Turn the axe over and repeat the process, circling in the opposite direction.

Axe

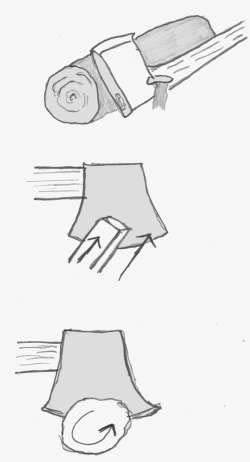
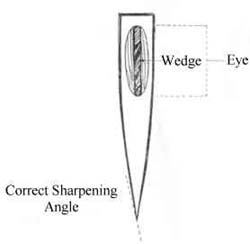
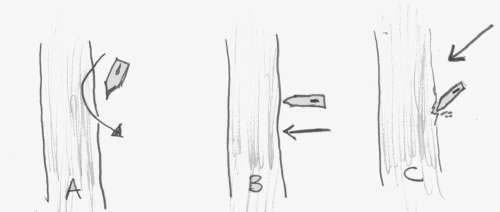
An axe can be a very useful tool in camp. Note however that there are many different types of axe and they tend to be suitable for a limited range of work. In Scouting this should not present too much of a problem as we tend not to use the more 'specialist' types of axes.

Blade Profile

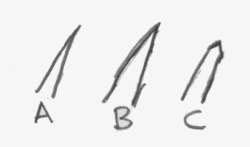
A is too fine and might chip.
B is good.
C is too steep and will wear quickly.

Sharpening


If you don't have a sharpening stone for your knife, remember that any sandstone will sharpen tools (a grey, clayey sandstone being the best). Quartz is good, though rare, and granite can also be used. Rub two pieces together until they are smooth. A double- faced stone with a rough and a smooth surface will be ideal and should be carried in the sheath pocket.

Use the rough surface first to remove burrs, then the smooth one to get a fine edge. The object is not to get the sharpest edge possible, but to get an edge that will last and not chip.

To sharpen the blade, hold the handle in the right hand. Use a clockwise circular motion and apply a steady pressure on the blade with the fingertips of the left hand as you push away. Keep the angle constant. Keep the stone wet. Rock particles on the blade will show the angle you are obtaining. Do not drag the blade towards you under pressure as this will produce burrs. Reduce the pressure for a finer edge. Work counterclockwise on the other side.

Handled Knife

By a 'handled' knife I just mean an ordinary general purpose bladed knife. Take care to choose the handle. A single, rounded piece of wood is ideal, with the knife tang passing through it and fastened at the end. This way if the handle breaks the tang can be wrapped with cloth or twine.

The middle picture shows a handle that is only riveted to the tang and would quickly cause blisters.

The bottom picture shows a handle that could break at the rivets if subject to heavy work and the short tang would make it difficult to replace the handle.

Sheaths

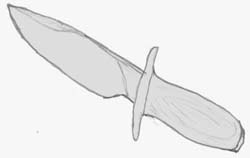
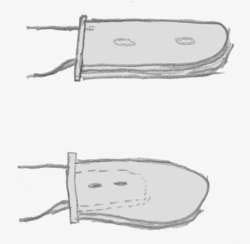
A sheath is a must for any normal knife. Always replace the knife in its sheath when not in use, even if only for a minute or so of inactivity. A sheath should be made from strong, stitched leather, with a tunnel belt loop. Ensure that it has a positive fastening to secure the knife. Some sheaths may have additional small pockets for a penknife or a sharpening stone. These could be useful to have.

Folding Knives

A folding knife can be very useful, provided it has a good locked position. If the blade does not lock firmly, forget it, look elsewhere. A blade within a wooden handle will be the most comfortable as it will not slip when your hands get sweaty, and if the handle is made from a single piece of wood, it is less likely to cause blisters than other types.

Safety Issues

A knife can be an invaluable asset in all kinds of situations. However you must remember that knives are dangerous, and can be weapons. Safety should always be of paramount importance. No-one (and this includes leaders!) should be allowed to carry or handle a knife unless they have proven their competence to an experienced instructor. I would not allow scouts to carry knives on their person at camp all the time, only when the activity specifically requires the use of knives. I would certainly never allow anyone to carry a knife on their person off the site, there is simply no need for it. Off site the knife should be safely stored in your backpack.

Remember you are only as sharp as your knife. You must keep your knife sharp ready for use, a blunt knife is a dangerous instrument and an inefficient tool. Don't misuse your knife. Never throw it into trees or the ground. Keep it clean, and if you don't intend to use it for a while, oiled and in its sheath.

Choosing A Knife

The multi-bladed type knifes ('Swiss army knife') can be useful, but if you only have a single knife you will need something stronger with a general purpose blade.

You can buy some knives that have a compass built into the handle, or have the handle hollowed out so that you can carry equipment inside it. However I would consider this a waste of money. The compass will eventually lose its accuracy after the knife has been used (especially if you use it on hardwoods), and the hollow handle will soon break with use.

The only two general purpose knives I would recommend are a decent folding knife, and a strong 'handled' knife (err, that is a poor name of my own choosing. I wasn't sure how to explain it. I just mean an 'ordinary' knife).

As far as the blade goes, for scouting purposes I would steer clear of the ones on the market that boast several different edges over the length of the blade (serrated, skinning, saw etc. The 'survival' type knifes). I would simply opt for a knife with a good clean edge, that perhaps does have different levels of fineness to the edge along the length of the blade.
share Share linkedin Twitter Facebook Google+